#import <UIKit/UIKit.h>
@interface rootView : UIViewController <UITableViewDelegate, UITableViewDataSource> {
NSDictionary *names;
NSArray *keys;
NSMutableArray *namesData;
}
@property (nonatomic, retain) NSDictionary *names;
@property (nonatomic, retain) NSArray *keys;
@property (nonatomic, retain) NSMutableArray *namesData;
@end
헤더 파일에 일단 기본적인 TableView에 대한 delegate, datasource를 선언해 줍니다.
names, keys, namesData는 TableView에 들어갈 데이터를 위한 변수들이죠.
rootView.m
#import "rootView.h"
@implementation rootView
@synthesize names, keys, namesData;
- (void)viewDidLoad {
NSString *path = [[NSBundle mainBundle] pathForResource:@"sortednames" ofType:@"plist"];
NSDictionary *dict = [[NSDictionary alloc] initWithContentsOfFile:path];
self.names = dict;
[dict release];
NSArray *array = [[names allKeys] sortedArrayUsingSelector:@selector(compare:)];
self.keys = array;
self.namesData = [[NSMutableArray alloc] init];
for (NSString *key in keys)
{
[namesData addObjectsFromArray:[names objectForKey:key]];
}
pageNumber = 1;
[super viewDidLoad];
}
- (void)viewDidUnload {
[super viewDidUnload];
// Release any retained subviews of the main view.
// e.g. self.myOutlet = nil;
self.names = nil;
self.keys = nil;
self.namesData = nil;
}
- (void)dealloc {
[names release];
[keys release];
[namesData release];
[super dealloc];
}
.m에서 수정할 부분은 기본적인
@synthesize
- (void)viewDidLoad
- (void)viewDidUnload
- (void)dealloc
이 3 함수이겠지요?
synthesize에서 잡아준 변수들 설정해주고,
viewDidLoad에서 기본 Data를 읽어 들이고, view 종료시 메모리 반환용 viewDidUnlaod와 dealloc의 설정
ViewDidLoad에서 사용한 것은
우선 파일 path를 설정해주고
NSString *path = [[NSBundle mainBundle] pathForResource:@"sortednames" ofType:@"plist"];
설정해준 path를 기준으로 Dictionary에 넣은다음
NSDictionary *dict = [[NSDictionary alloc] initWithContentsOfFile:path];
self.names = dict;
[dict release];
Dictionary에 넣은 데이터에서 key값들을 array에 넣어주고
NSArray *array = [[names allKeys] sortedArrayUsingSelector:@selector(compare:)];
self.keys = array;
dictionary와 key값을 이용해서 하나의 단일 array로 만들어 줘 보았습니다.
self.namesData = [[NSMutableArray alloc] init];
for (NSString *key in keys)
{
[namesData addObjectsFromArray:[names objectForKey:key]];
}
section을 나누어도 상관은 없는 이야기지만, 좀 더 알기 쉽게 하기 위해 section을 없애는게 편하다고 생각했거든요
여기까지 기본 설정을 해 준다음 다음은 TableView의 delegate와 datasource를 설정해야겠지요.
#pragma mark -
#pragma mark TableView delegate
- (NSInteger)tableView:(UITableView *)tableView numberOfRowsInSection:(NSInteger)section
{
return namesData.count;
}
- (UITableViewCell *)tableView:(UITableView *)tableView cellForRowAtIndexPath:(NSIndexPath *)indexPath {
static NSString *tableViewCell = @"tableViewCell";
UITableViewCell *cell = [tableView dequeueReusableCellWithIdentifier:tableViewCell];
if (cell == nil)
cell = [[[UITableViewCell alloc] initWithStyle:UITableViewCellStyleDefault reuseIdentifier:tableViewCell] autorelease];
cell.textLabel.text = [namesData objectAtIndex:indexPath.row];
return cell;
}
#define kPageDivide 20
@interface rootView : UIViewController <UITableViewDelegate, UITableViewDataSource>
안에
NSUInteger pageNumber;
를 추가합니다.
다음,
rootView.m 으로 돌아와서
- (void)viewDidLoad 앉에 첫 페이지를 설정해줍니다
pageNumber = 1;
tableView delegate로 가서
#pragma mark -
#pragma mark TableView delegate
다음과 같이 코드를 수정합니다.
- (NSInteger)tableView:(UITableView *)tableView numberOfRowsInSection:(NSInteger)section {
if ((pageNumber * kPageDivide) < namesData.count)
{
return (pageNumber * kPageDivide) + 1;
}
else {
return namesData.count;
}
}
우선 한 페이지에 보여주는 row의 수를 결정하는것인데, 두가지 분기로 나누어 지게 됩니다.
현제 페이지 수를 확인해서 최대로 보여질수 있는 목록수를 확인하고, 그 목록수가
namesData가 가지고 있는 데이터의 수보다 적다면 그대로 pageNumber * kPageDivide + 1
을 리턴하게 되겠지요. 여기서
+1
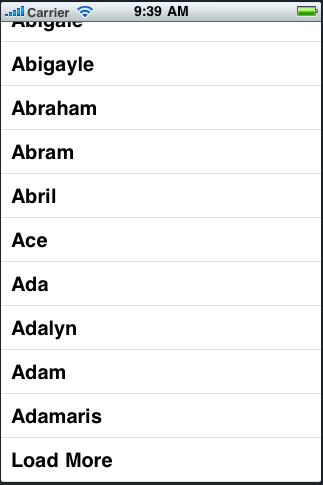
을 붙인 이유는 테이블 목록에 아직 더 보여줄 목록이 남아있을경우, "Load More" 같이
마지막 셀을 클릭시 페이지를 더 로딩하기 위한 셀을 표시해야 하기 때문이죠.
만약 최대로 보여질수 있는 목록수가 namesData가 들고있는 수보다 많으면 당연히
namesData.count
를 리턴하는거죠
- (UITableViewCell *)tableView:(UITableView *)tableView cellForRowAtIndexPath:(NSIndexPath *)indexPath {
static NSString *tableViewCell = @"tableViewCell";
UITableViewCell *cell = [tableView dequeueReusableCellWithIdentifier:tableViewCell];
if (cell == nil)
cell = [[[UITableViewCell alloc] initWithStyle:UITableViewCellStyleDefault reuseIdentifier:tableViewCell] autorelease];
if ((pageNumber * kPageDivide) < namesData.count)
{
if (indexPath.row != (pageNumber * kPageDivide)) {
cell.textLabel.text = [namesData objectAtIndex:indexPath.row];
}
else {
cell.textLabel.text = @"Load More";
}
}
else
{
cell.textLabel.text = [namesData objectAtIndex:indexPath.row];
}
return cell;
}
다음, 각 셀을 표시할때도 마찬가지로, 최대로 보여질수 있는 목록수와 namesData의 목록수를 비교해서
namesData가 클 경우 보통의 cell을 표시해주고, 마지막 cell에 페이지 로딩을 위한
cell.textLabel.text = @"Load More";
를 지정해 주는겁니다.
물론 namesData의 데이터 수가 작을경우는
평범하게 데이터를 표시하면 되는거죠.
여기까지 하셨다면 Build and Run시에 목록이 20개만 나오고, 마지막 21번재는 Load More 가 표시되겠지요.
이제는 Load more를 눌렀을 경우 목록을 더 불러오는 기능을 만들어야겠지요.
- (void)tableView:(UITableView *)tableView didSelectRowAtIndexPath:(NSIndexPath *)indexPath
{
[tableView deselectRowAtIndexPath:indexPath animated:YES];
if ((pageNumber * kPageDivide) < namesData.count)
{
if (indexPath.row != (pageNumber * kPageDivide)) {
NSString *str = [NSString stringWithFormat:@"you have pushed %@", [tableViewcellForRowAtIndexPath:indexPath].textLabel.text];
UIAlertView *alert = [[UIAlertView alloc] initWithTitle:@"Warning" message:str delegate:nil cancelButtonTitle:@"O K"otherButtonTitles:nil];
[alert show];
[alert release];
}
else {
pageNumber++;
[tableView reloadData];}
}
}
가장 기본이 되는것은 역시 아래쪽의 단 두줄입니다.
pageNumber++;
[tableView reloadData];
if 문을 통해 선택한 셀이 마지막 셀인지 아닌지 체크해서
if (indexPath.row != (pageNumber * kPageDivide))
마지막 셀이라면 pageNumber count를 1 올려주고,
그저 tableView를 reloadData만 시켜주면 되는거지요.
끝입니다. 엥? 뭐이리 간단해? 이지요?
수정하고 한번 테스트 해 보세요. 광속처럼 페이지가 로딩이 될겁니다.
이상태로도 이제 사용이 가능한거죠.
하지만 이대로 끝내기는 뭔가 찜찜하고 심심하죠.
그래서 뱅글뱅글 로딩화면을 한번 추가해 볼게요.
rootView.m 으로 가서
UIActivityIndicatorView *activityIndicator;
@property (nonatomic, retain) UIActivityIndicatorView *activityIndicator;
- (void)stopAnimation;
이 3개를 추가해 줍니다.
다음 rootView.h에서는
@synthesize activityIndicator;
- (void)viewDidUnload {
[super viewDidUnload];
// Release any retained subviews of the main view.
// e.g. self.myOutlet = nil;
self.names = nil;
self.keys = nil;
self.namesData = nil;
self.activityIndicator = nil;
}
- (void)dealloc {
[names release];
[keys release];
[namesData release];
[activityIndicator release];
[super dealloc];
}
를 수정해 줍니다.
다음으로
- (void)tableView:(UITableView *)tableView didSelectRowAtIndexPath:(NSIndexPath *)indexPath
함수에서
else {
pageNumber++;
activityIndicator = [[UIActivityIndicatorView alloc] initWithFrame:CGRectMake(0, 0, 32, 32)];
[activityIndicator setCenter:CGPointMake(160, 208)];
[activityIndicator setActivityIndicatorViewStyle:UIActivityIndicatorViewStyleGray];
[self.view addSubview:activityIndicator];
[activityIndicator release];
[activityIndicator startAnimating];
[self performSelector:@selector(stopAnimation) withObject:nil afterDelay:2];
[tableView reloadData];
}
이런식으로 수정해 줍니다.
대충 감이 오시지요?
요는 tableView reloadData를 할때
activityIndicator를 돌려주고, 2초후에 activityIndicator를 정지할 함수를 실행해 주는거죠
마지막으로
- (void)stopAnimation {
[activityIndicator stopAnimating];
}
를 추가해 줍니다.
Build and Run을 해보시면 Load More를 눌렀을 경우 뱅글이가 생긴걸 확인하실수 있을거에요.
출처 : http://cafe.naver.com/mcbugi.cafe?iframe_url=/ArticleRead.nhn%3Farticleid=48620
'프로그램 > iPhone' 카테고리의 다른 글
| 키보드에 의해 텍스트필드가 안보일 때 쓰는 스크롤뷰 (0) | 2011.01.13 |
|---|---|
| iPhone - combobox (0) | 2011.01.12 |
| iPhone UIButton 을 UISwitch(체크박스)처럼 이용하기 (0) | 2011.01.11 |
| 키보드 확장: 키보드에 툴바 추가하기 2 (0) | 2011.01.10 |
| 아이폰용 오픈소스/예제/참고자료 모음 (0) | 2011.01.04 |